


Why I Run My Own Network in My Girlfriend's Apartment
Plugged into a managed apartment network and could see other people's devices. A $50 router, OpenWrt, and encrypted DNS later, we have a private network with gigabit speeds and full control.
We tested 80 MHz and 40 MHz WiFi in a dense apartment building. The difference was 16 Mbps vs 220 Mbps on the same hardware. Here's why wider channels fail in apartments, the tools to diagnose it, and exactly how to fix it.

We were getting bizarre WiFi problems in my girlfriend's apartment. Not the obvious "no signal" kind. The kind where you hold your phone one way and get zero throughput, flip it 180 degrees and everything works. Where the laptop in the center of the bed gets maybe 1 Mbps, but move it two feet to the side and it's fine. Where certain devices, like my iPad Pro (2018), would struggle constantly while newer devices would mostly be okay, probably because of differences in antenna design.
It wasn't consistent either. Sometimes things would just work. Other times, pages wouldn't load, streams would buffer down to 480p and then stop entirely, AirDrop transfers would crawl. And it wasn't just one spot. We'd get dropouts in the bedroom, the bathroom, even the kitchen occasionally. Just weird, inconsistent behavior all over.
This is a newer apartment building with Ruckus access points built into every unit. Professional setup, managed by an outsourced IT company. I wrote about the full apartment network setup here. We also had our own TP-Link EAP245 access point running on the 5 GHz band, which I figured would solve things. It didn't.
The first thing I did was stop guessing and start collecting data. I ran PingPlotter on my laptop and just let it run during normal use across a few sessions. PingPlotter shows you every hop between your device and the destination, and it visualizes latency and packet loss at each one. What I saw was that the problems were showing up in the very first hops, which meant it wasn't something downstream like the building's internet connection or the destination server. The issue was right here, in the room, between my devices and the access point.
One thing worth noting: PingPlotter isn't always perfectly clear. Sometimes you'll see latency and packet loss showing up across multiple hops at once, like a cascading effect, and it's hard to tell where the actual problem is starting. If everything downstream looks bad, it's often because the first hop is bad and everything after it inherits that instability. But other times it's genuinely ambiguous. In those cases, screenshot what you're seeing and ask an AI model to help interpret it, or just focus on whether the pattern correlates with anything physical, like your position in the room, the time of day, or specific devices. That's what led me to the next clue.
I could also reliably reproduce the problem physically. Lying on my side of the bed, if I held my phone in a certain area pointed in a certain direction, I'd get effectively zero internet. Flip it around and everything was fine. The laptop dead center in the bed was dramatically slower than the laptop at the edge of the bed. This pointed to destructive interference, where WiFi signals bouncing off walls, the ceiling, and furniture create dead zones in specific physical locations. The building's construction and the density of wireless signals from neighboring units were making it worse.
The access point was on auto settings, which typically means 80 MHz channel width. Wider channels give you more theoretical bandwidth, so most routers and access points default to the widest they can. In a house with no close neighbors, that's fine. In an apartment building where every unit has its own access point, it's a disaster.
I used WiFi Explorer Pro 3 (Mac, paid but has a trial) and later Netspot (Mac and Windows, free, the one I actually kept using) to scan the environment. What I saw was that at 80 MHz, the channel was just too wide for this environment. With dozens of access points packed into one building, the interference was overwhelming. The wider your channel, the more of the spectrum you're occupying, and the more likely you are to collide with your neighbors.
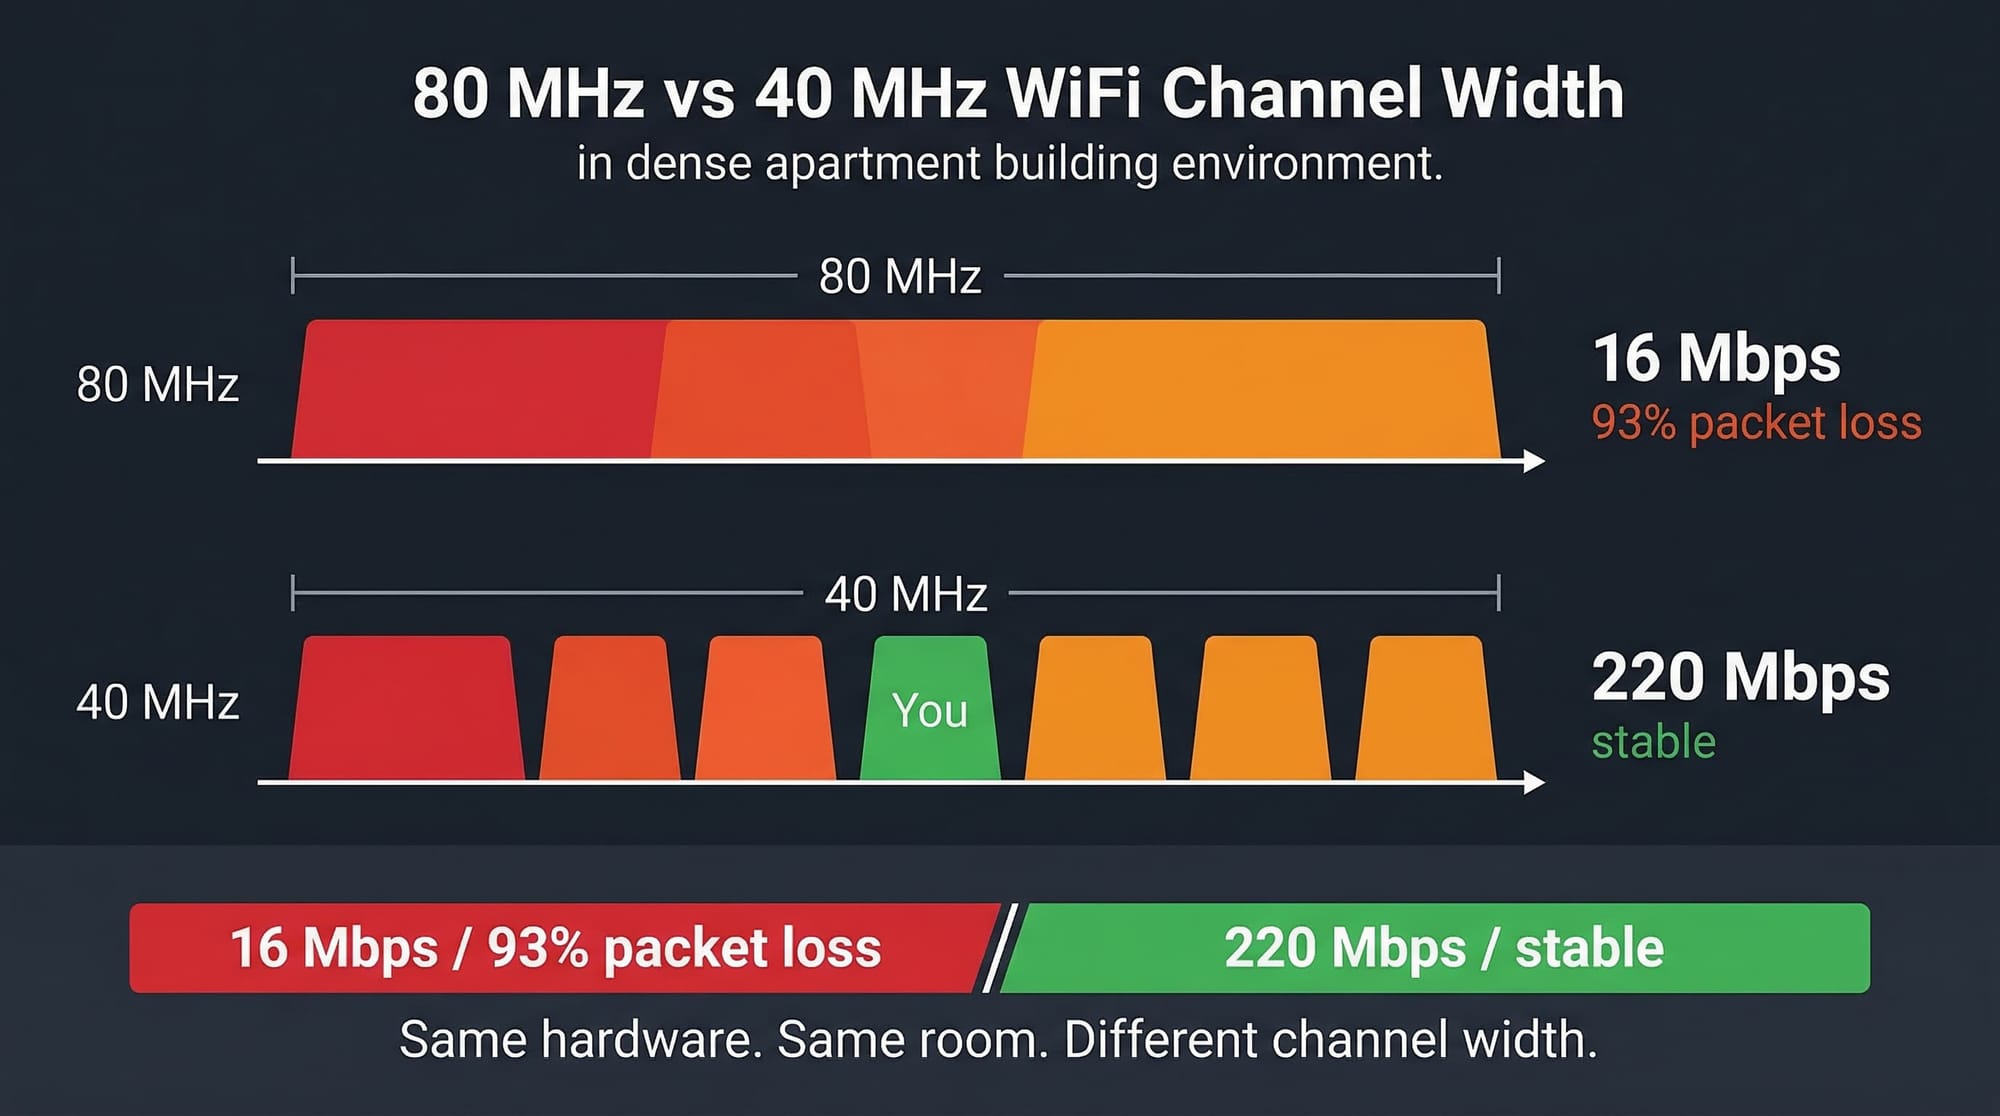
The numbers told the whole story. On 80 MHz, I measured 16 Mbps down with roughly 93% packet loss. Effectively unusable. I switched to 40 MHz on channel 149, a spot in the UNII-3 band where there was a gap in neighbor activity. The result: 220 Mbps down, 97 Mbps up, stable, at about 8 feet from the access point. That's roughly 85% of the theoretical maximum for WiFi 5 with 3x3 MIMO at 40 MHz, which is excellent for an apartment.
Same hardware. Same room. Same devices. Just a different channel width and a better channel selection. The difference was 16 Mbps vs 220 Mbps.
MIMO stands for Multiple Input, Multiple Output. It refers to how many antennas the access point uses to send and receive data simultaneously. A 3x3 MIMO access point like the EAP245 has three antennas working together, which allows it to handle more data at once compared to a 2x2 setup (which is what most consumer routers have). More streams generally means better throughput, especially when conditions are good. You'll sometimes see this written as 3x3:3 or 2x2:2, where the last number is the number of spatial streams.
WiFi versions are marketing names for the underlying technical standards. WiFi 5 (802.11ac) is from 2014 and supports up to 80 or 160 MHz channels on 5 GHz. WiFi 6 (802.11ax) from 2020 added better performance in crowded environments, support for the 6 GHz band (WiFi 6E), and improved power efficiency for mobile devices. WiFi 7 (802.11be) is the latest, adding even wider channels and more advanced features. For most apartment setups, WiFi 5 or WiFi 6 hardware at 40 MHz will perform great. The version matters less than the channel width and channel selection in a dense environment.
It comes down to spectrum. At 80 MHz, your access point occupies four 20 MHz channels worth of spectrum. In the entire 5 GHz band, that means there are only about 4 to 6 non-overlapping 80 MHz channels available. In a building with dozens of access points, those channels fill up fast. Every overlapping signal causes collisions, retransmissions, and packet loss.
At 40 MHz, you're using half the spectrum per channel. That gives you roughly 12 non-overlapping channels to work with. Much easier to find a gap. You give up some theoretical peak speed, but in a dense environment you were never going to hit that peak anyway because of all the interference. The real-world throughput at 40 MHz in a crowded building will almost always beat 80 MHz because you're actually getting clean air time instead of fighting everyone around you.
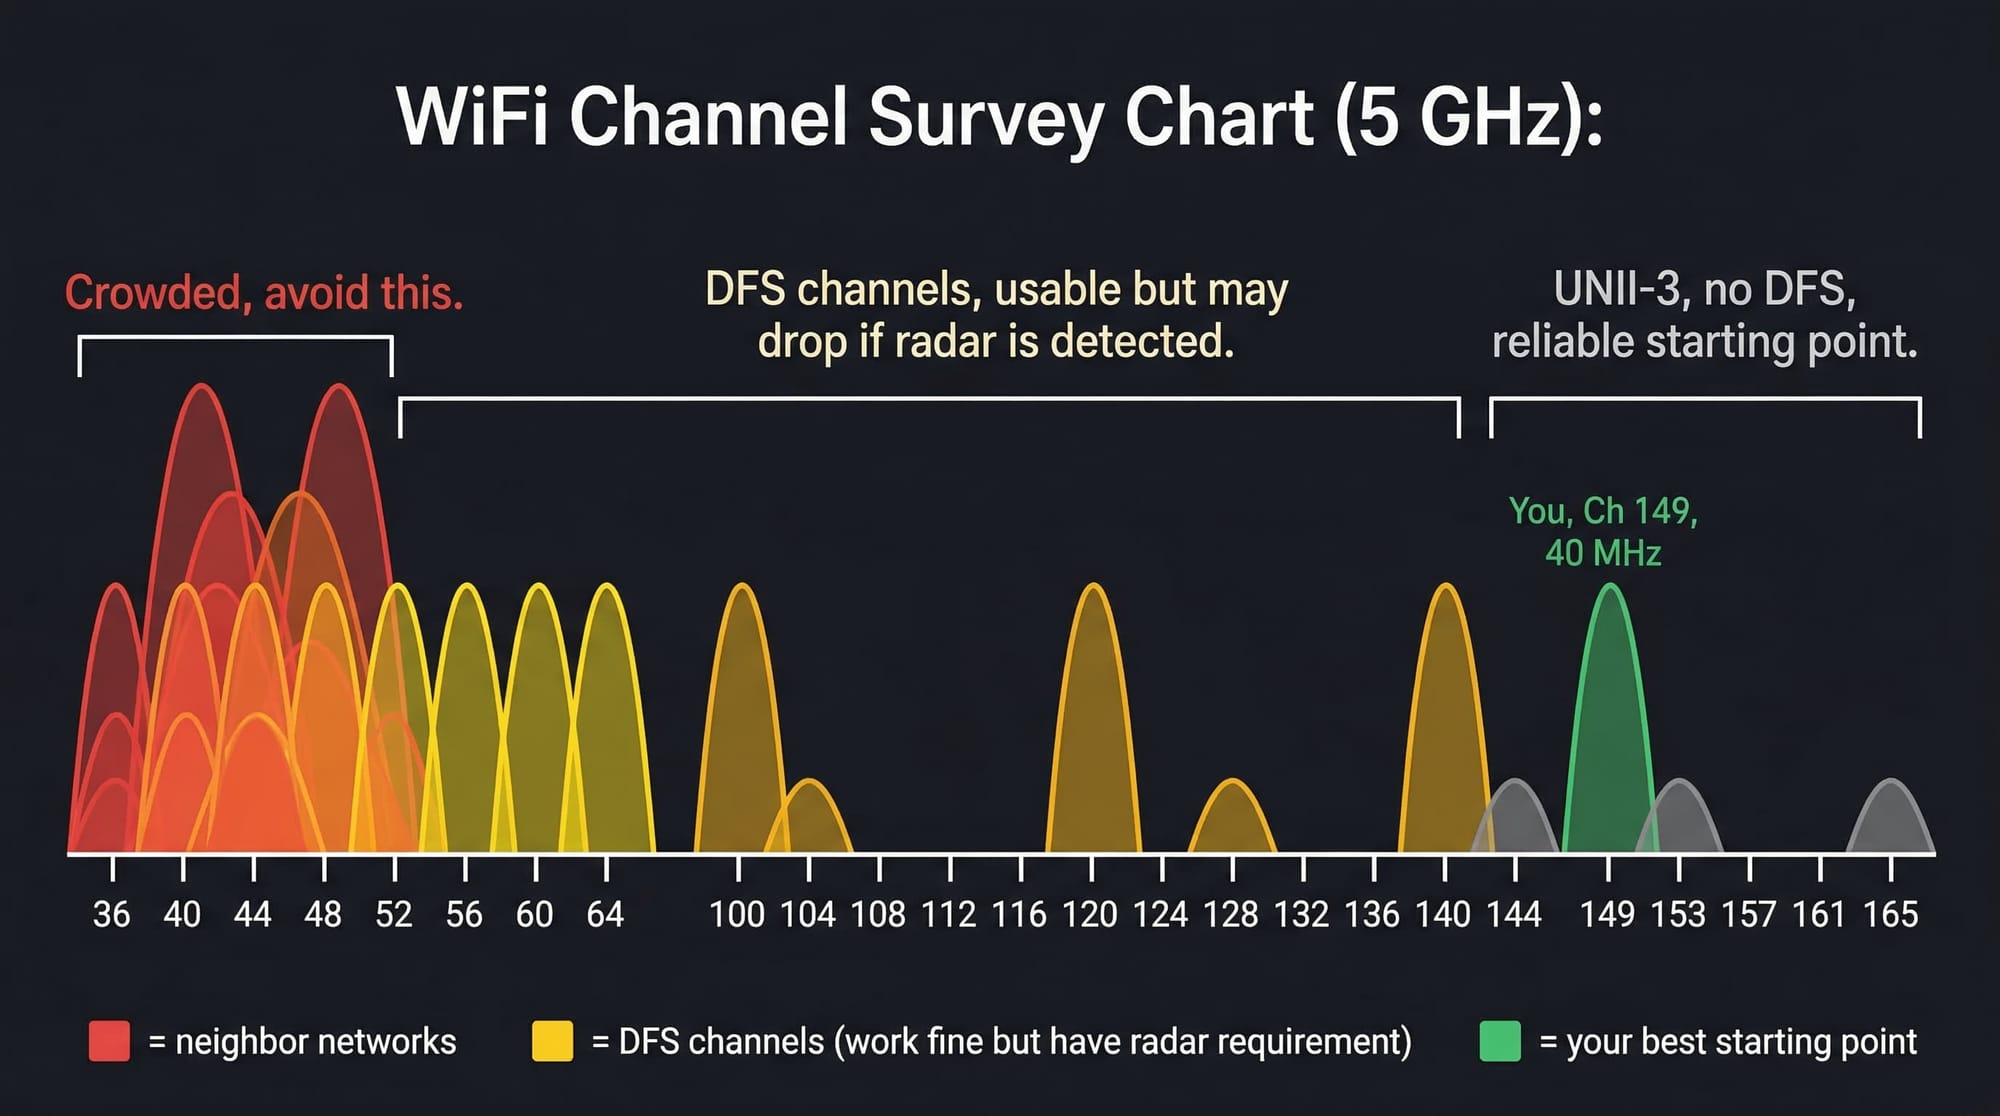
The 5 GHz WiFi band is divided into several sub-bands called UNII (Unlicensed National Information Infrastructure). UNII-3 includes channels 149, 153, 157, 161, and 165. These channels don't require DFS (Dynamic Frequency Selection), which is a system that forces your access point to stop transmitting and switch channels if it detects radar signals. DFS channels (UNII-2 and UNII-2 Extended, roughly channels 52 through 144) can work fine, but there's always a chance your AP will randomly drop off the channel because it thought it detected radar. In an apartment, that means a sudden WiFi dropout for no apparent reason. Using UNII-3 channels avoids that entirely. It's one less variable that can go wrong.
Here's what I actually used to diagnose and fix this, in the order I'd recommend trying them.
PingPlotter (Mac, Windows) was the most useful diagnostic tool. It runs continuously and shows you exactly where problems are occurring hop by hop. If your first hop (your router or access point) is showing packet loss and latency spikes, the problem is your local WiFi, not your internet connection. This is the first thing to run because it tells you whether you're even looking at the right problem.

Netspot (Mac, Windows, free) is what I actually kept using for WiFi scanning and surveying. It shows you every network around you, what channel they're on, how wide their channel is, and their signal strength. The visual channel chart is what matters. You're not looking at spreadsheets, you want the graph that shows you where the gaps are. This is the tool I'd recommend for most people because it's free, works on both Mac and Windows, and doesn't expire.

WiFi Analyzer (Android, open source) by VREM Software Development is excellent if you have an Android device. Same kind of visual channel chart. Fully open source, doesn't require internet access, no data collection, no tracking. Available on Google Play and F-Droid. Does everything you need on a phone.

Network Analyzer (iPhone) is honestly limited. iOS doesn't let apps do full WiFi scanning, so you can't see neighboring networks or their channels. It's useful for finding device IPs and open ports on your own network, like if you forgot what IP your access point's web interface is on. But for actual WiFi troubleshooting, it's not the right tool. This is one area where Android is genuinely more capable than iOS.
WiFi Explorer Pro 3 (Mac, paid) is what I started with. It's powerful and detailed, but the trial runs out and it costs money. If you're doing this professionally or frequently, it might be worth it. For a one-time apartment WiFi fix, Netspot does the job.
If you run a scan and don't fully understand what you're seeing, screenshot it and paste it into a good AI model. Claude is what I'd recommend. Google Gemini works well for this too. Any decent model will be able to look at a WiFi survey chart and tell you which channel to pick and why. That's probably the single most accessible troubleshooting tip I can give: collect the data even if you don't understand it, then get help interpreting it.
This is the practical walkthrough. You don't need to be a network engineer to do this. You just need to be willing to spend 30 minutes collecting some information and making a few changes.
Step 1: Figure out what you're working with.
What access point or router are you using? If it's something the building provides, look at the device. Does it have a name or model number? Flip it over, take a photo of the label. If it's your own router, you probably already know what it is. Write down or note what you have, because you'll need to know how to log into its settings later.
Step 2: Check if the problem is actually your WiFi.
Before you start changing WiFi settings, make sure WiFi is actually the problem. Download PingPlotter and let it run for 10 to 15 minutes during normal use. Watch the first hop, which is your router or access point. If that first hop is showing red (packet loss) and high latency spikes, your local WiFi is the issue. If the first hop is clean and the problems show up further down the chain, your WiFi is fine and the issue is with your internet connection or something upstream. This step saves you from spending an hour optimizing WiFi settings when the real problem is somewhere else.
Step 3: Scan your WiFi environment.
Download Netspot (Mac or Windows) or WiFi Analyzer (Android). Open it up and look at the 5 GHz band. You'll see a chart showing all the wireless networks around you, what channel each one is on, how wide their channels are, and their signal strength. What you're looking for is a gap. A channel, or a range of channels, where there's less activity from your neighbors. Don't worry about understanding every detail of what you see. Just look for where it's crowded and where it's not.
If you're not sure what you're seeing, take a screenshot and paste it into Claude or another AI model. Ask it: "I'm in an apartment building and my WiFi is slow. Here's a scan of the 5 GHz networks around me. What channel and width should I use?" You'll get a useful answer.
Step 4: Log into your access point and change the settings.
Find your access point's web interface. This is usually an IP address you type into your browser, something like 192.168.1.1 or 192.168.0.1, or whatever your specific device uses. Check the bottom of the device or the manual for the default address and login.
Once you're in, find the wireless settings for the 5 GHz band and make these changes:
Set the channel width to 40 MHz. Not auto, not 80 MHz. 40 MHz. This is the single most impactful change you can make in a dense environment.
Set the channel to whatever gap you found in your scan. If you're not sure, channels 149, 153, or 157 are good starting points because they're in the UNII-3 band and don't have DFS complications.
For TX power (transmit power), medium is generally better than max in an apartment. If you're getting full signal bars on your devices within the space you actually use, you don't need to blast at full power. Higher power in a dense building just adds more noise to the wireless environment and can actually make things worse. Your devices also transmit at much lower power than your access point, so cranking the AP to max creates an asymmetry where the AP can reach your phone but your phone can't effectively reach back. 16 dBm or a "medium" setting is a good starting point. The recommended professional range is 10 to 17 dBm for indoor deployments.
Apply the settings and give it a few minutes. Your devices might need to reconnect.
Step 5: Test and verify.
Run a speed test. Compare it to what you were getting before. If you didn't measure before, just use the connection for a while. Go to the spots that used to be problematic. Lie in bed where the dead zone was. Stream something. If it's noticeably better, you're done.
If it's not better, go back to your scan and try a different channel. The first one you pick might not be the best, especially if conditions change (neighbors turning things on and off). You might need to try two or three channels before you find the right one.
Step 6: One more thing, check your lease.
Make sure you're allowed to run your own access point if that's what you're doing. Most buildings don't care, especially if you can see other residents running their own networks in your WiFi scan. But it's worth checking the lease or any internet policy that came with move-in, just so you know where you stand. If your building doesn't allow it, there are more advanced ways to make a router appear as a regular device on the network (MAC address cloning, TTL adjustment), but that's a topic for another time.
In a dense apartment building, 80 MHz WiFi channel width is almost always worse than 40 MHz. The theoretical speed advantage of 80 MHz disappears completely when you're fighting dozens of neighboring access points for the same spectrum. 40 MHz on a well-chosen channel will give you dramatically better real-world performance.
Our setup settled at 220 Mbps on WiFi 5 at 40 MHz. Before that, on 80 MHz, we were getting 16 Mbps with 93% packet loss. Same equipment, same room. The only difference was channel width and channel selection.
Scan your environment, find a gap, set 40 MHz, pick the right channel, and test. Thirty minutes of work can take your WiFi from unusable to excellent.
Still dealing with bad WiFi or network issues? I help people fix this stuff. Remote walkthroughs over FaceTime or screen share, or in-person if you're in the Cleveland / Northeast Ohio area.
Subscribe to my newsletter to get the latest updates and news

Member discussion